How To Schedule Scans Using Campaigns in Local Falcon
Last updated on 1/15/2026, 3:39 PM
Local Falcon's "Campaign Scan" feature is a powerful tool you can use to schedule recurring Map Scans for multiple business locations, using the same Scan Settings for each scan or customizing the settings for specific locations within the Campaign. You can also use Campaigns to automate your local visibility intelligence across multiple platforms, from Google Business Profile to Google AI Overviews and other leading AI search tools.
Setting up Campaigns for groups of similar business locations saves you time by running rank tracking scans for you at regular intervals without requiring you to manually choose locations and keywords to scan for or set the Map Scan Radius and Grid Size every time.
Campaigns also allow you to automatically send reports to the people you want to share them with, making them ideal for users who want to share Campaign Reports with multiple clients, team members, and other stakeholders.
Creating a New Campaign
- Log in to your Local Falcon account
- Go to the Local Falcon homepage and click "Login" in the top right-hand corner, then enter the email address and password you used to create your account.
- Go to Your Campaign Scans
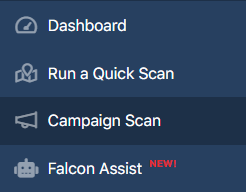
- Select "Campaign Scan" from the main navigation menu on the left-hand side of the screen.
- Select "Campaign Scan" from the main navigation menu on the left-hand side of the screen.
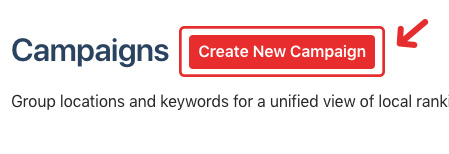
- Click the "Create New Campaign" button at the top of the screen
- Once you create Campaigns, they will be displayed on this screen as well and you can choose to edit them (see section on Editing an Existing Campaign below).
- Once you create Campaigns, they will be displayed on this screen as well and you can choose to edit them (see section on Editing an Existing Campaign below).
- Enter a name for the new Campaign
- Type the desired Campaign name into the text box displayed on this screen, then click the "Start Configuring Campaign" button below.
Tip: It's best to give your Campaign a name that helps you easily identify which business locations it's for.
- Type the desired Campaign name into the text box displayed on this screen, then click the "Start Configuring Campaign" button below.
- Set the Grid Size and Scan Radius
- Select the Grid Size and Scan Radius from their respective drop-downs in the "Base Scan Settings" section. These default settings can be updated per location in a later step.
Tip: We recommend running a few individual "baseline" Map Scans for your business locations before you set up ongoing Campaigns to get an idea of what Grid Size and Scan Radius settings work best.
- Select the Grid Size and Scan Radius from their respective drop-downs in the "Base Scan Settings" section. These default settings can be updated per location in a later step.
-
Select the Campaign Scan data sources
Choose from the list of available local visibility sources to automate rank tracking for Google Business Profile/Apple Business Connect (whichever is the native location platform) and AI visibility platforms (ChatGPT, Google AI Overviews, Google AI Mode, Gemini, Grok, etc.).
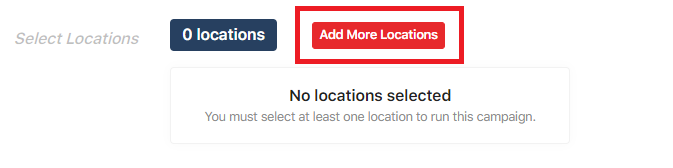
- Add the business locations to the Campaign
-
Click the "Add More Locations" button and choose any of your existing locations (or Location Groups) to add to the Campaign.
-
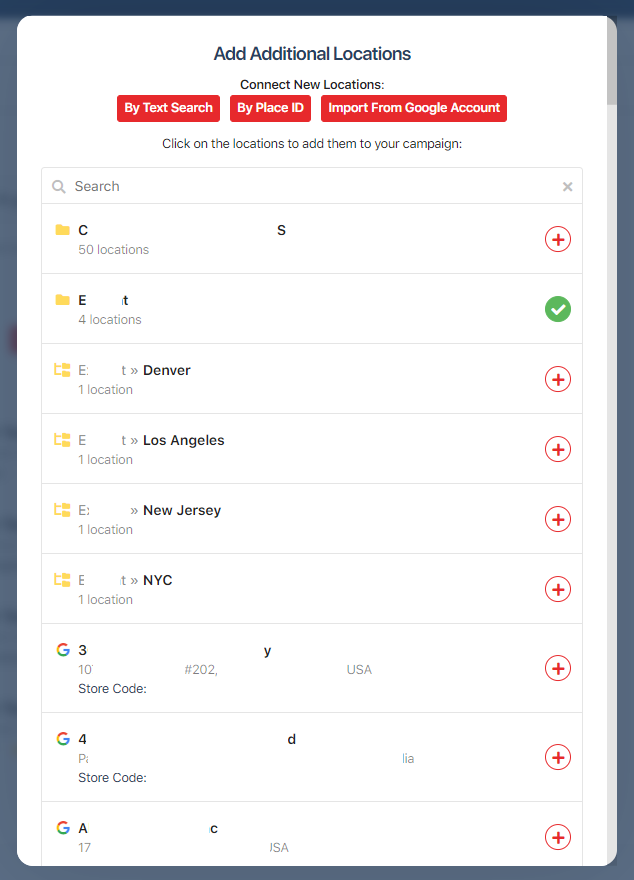
Any business locations you've imported from a connected Google account or run a scan for in the past will be shown in the pop-up. You can search for them by typing a name or address into the search bar, or simply by scrolling down the list.
-
If you don't see a business location you want to include in the Campaign, you can add it by Text Search, by entering a Google Place ID, or by importing from a Google account (these buttons are all above the search bar).
-
Click the "Close" button at the bottom of the pop-up (or hit the "X" in the top right-hand corner of your screen) after you've selected all the business locations you want to add to the Campaign.
-
After adding your locations, you can click on the scan settings next to a location to adjust the scan grid and radius for an individual location or you can also search for a certain group in the added locations, click the select all check box, then update scan settings for or remove all selected locations.

Tip: To obtain the best Local Rank Tracking data and optimize your credit usage, we recommend running separate Campaigns for businesses in areas with different population densities (for example, rural business locations in one Campaign and urban businesses in another). To make setup easier for future campaigns, you can create Location Groups for similar business locations.
-
- Disable any unwanted grid points
- Click the "Modify Grid for This Location" button for any location, then click on individual grid points to disable them. You can also customize the radius or grid size for any location if desired.
- Add the keywords you want to scan
- Click the "Enter More Keywords" button and type the keywords you want to add into the pop-up, separated by commas, then hit "Add Keywords" to add them to your new Local Falcon Campaign.
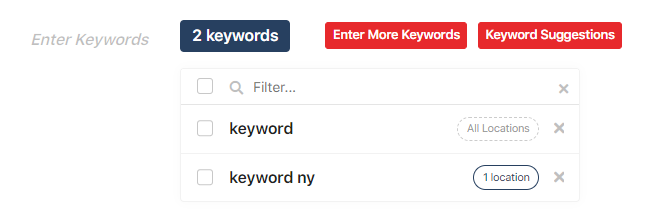
- After adding your keywords, you can click on the location settings next to a keyword to adjust which location(s) you'd like that keyword to be scanned for. You can also select multiple keywords, and then update location settings for or remove all selected keywords.

- Note that you can also specify whether keywords should be scanned for traditional local search platforms, AI search platforms, or both.
- Click the "Enter More Keywords" button and type the keywords you want to add into the pop-up, separated by commas, then hit "Add Keywords" to add them to your new Local Falcon Campaign.
- Enable/Disable Falcon AI to get Campaign Report analysis and actionable optimization recommendations
- Select "Yes" from the drop-down next to where it says "Generate AI Analysis on every scan?" in the "Additional Options section" if you want to generate Falcon AI report analysis for every Campaign Report.

- Select "Yes" from the drop-down next to where it says "Generate AI Analysis on every scan?" in the "Additional Options section" if you want to generate Falcon AI report analysis for every Campaign Report.
- Select a Campaign start date, Scan Frequency, and time to run scans
- Change the start date by clicking the text box next to "Start campaign on" and choosing a date from the calendar that pops up, or highlight the date and type a new one into the box using the format M/D/YYYY.
- Select the Scan Frequency from the drop-down menu next to "Run scans" — we recommend every week or every two weeks; if you want to scan monthly choose "every 4 weeks" instead of "monthly" to ensure that scans are always scheduled for the same day of the week.
- Choose what time to run scans for your Campaign by clicking on the text box showing a time and selecting a new time of day from the drop-down, or by highlighting the text and entering a new time manually. It's important to schedule scans for a time when all locations in the Campaign are open.
- Set up a Campaign Report notification email
-
To send a notification email to stakeholders after every Campaign run, fill out the fields on the screen to set it up. These include a sender name, a reply-to email, a subject, body text, and recipients.
Once you've filled out all the fields, click the "Preview Notification Email" button to see what the email will look like, make any adjustments you want to it, then click the "Continue" button at the bottom of the screen.
-
Editing an Existing Campaign
- Log in to your Local Falcon account
- Go to the Local Falcon homepage and click "Login" in the top right-hand corner, then enter the email address and password you used to create your account.
- Go to "Campaign Scans"
- Select "Campaigns" in the main navigation menu on the left-hand side of the screen.
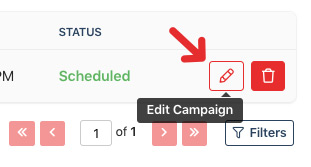
- Select the Campaign you want to edit
- All the Campaigns you've previously created will be displayed on this screen.
- Click the "Edit Campaign" button (indicated by a pencil icon) next to the Campaign you want to edit.
- Make changes to any of the Campaign settings as needed
- You can add or remove business locations and keywords, change the Grid Size and Scan Radius settings, enable/disable grid points, update visibility data sources, modify the Campaign schedule, turn on/turn off/update the Campaign Report notification email, and pause/resume the Campaign.
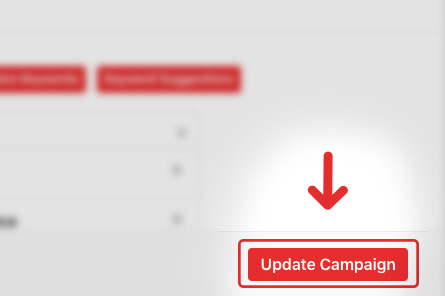
- Click the "Update Campaign" button when you're done
- This will save all of your changes and you can then go back to your Campaigns or navigate elsewhere within your Local Falcon account.
- This will save all of your changes and you can then go back to your Campaigns or navigate elsewhere within your Local Falcon account.
Categories:Map Scan ToolReporting
Tags:campaignsscheduling